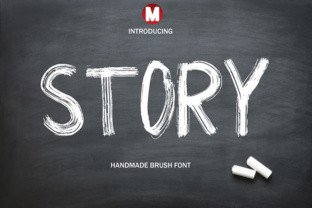
Why Most Designers Misuse Handmade Brush Fonts Like Story
You found a beautiful handmade brush font. The preview looks flawless. You imagine it on your wedding invitation, your brand logo, or that motivational quote you plan to sell. Then you install it, drop it into your project, and something feels off. The letters look disconnected. The flow is missing. The charm you saw in the promo image simply isn't there.
This scenario plays out constantly. And it's rarely the font's fault. It's almost always a misunderstanding of what a brush font like Story actually requires from the person using it. Let me walk you through the mistakes people make, so you can avoid the frustration and get the results you're actually after.
The Mistake of Treating a Brush Font Like Any Other Font
Most fonts you encounter were designed for mechanical uniformity. Every letter sits neatly on the baseline. Spacing is mathematically even. You type and the system handles the rest. A handmade brush font is fundamentally different. It carries the personality, weight variation, and slight irregularity of an actual brush stroke.
Story is a fresh, handmade brush font that captures that organic feel. But when people treat it like a standard sans-serif or a simple script font, the result feels flat. They type a word, see uneven spacing or unexpected letter connections, and assume the font is broken. In reality, the font is working exactly as intended. The mistake is expecting machine precision from a handcrafted tool.
What Happens When You Force It
You might end up increasing the tracking, adjusting individual letter positions manually, or even switching to a different font entirely. None of these solve the core issue. The font was built to be used with intention, not automation. If you approach it thinking you can type out a full paragraph and have it look ready for print, you will be disappointed.
The better approach is to understand that Story performs best when you give it room to breathe. Use it for short phrases, headlines, or signature-style elements. Let the natural brush texture and letter variation do the work instead of fighting it.
Overlooking the Importance of Character Alternatives
This is one of the most overlooked features in handmade brush fonts. Most people install a font, type their text, and call it done. They never realize the font includes alternate glyphs, swashes, or stylistic sets that completely change the look and flow of their text.
Story includes these alternatives for a reason. Using the default character every time creates repetition that kills the hand-lettered illusion. When the same letter appears twice in a word, and it looks identical both times, the viewer subconsciously recognizes it as a digital product, not something handcrafted.
A Simple Example
Imagine you are designing an invitation for a wedding. The couple's names both contain a letter "a." If you use the same "a" twice, the invitation loses its organic charm. By swapping one "a" for an alternate version from the font's stylistic set, you restore that handmade feel. The difference is subtle to a novice, but obvious to anyone with a trained eye, including your client.
Before you finalize any design using Story, open the glyph panel in your design software. Spend five minutes exploring the available alternates. Test different combinations. This single step separates amateur work from professional results.
Ignoring Font Pairing Fundamentals
A brush font is a statement. It draws attention. But a design built entirely around a brush font often feels overwhelming. The eye has nowhere to rest. Every element competes for attention, and the message gets lost in the visual noise.
The mistake people make is using Story for everything in a single design. They use it for the heading, the subheading, the body text, and even the fine print. The result looks chaotic and unpolished. It also undermines the very quality that makes the font appealing in the first place.
How to Pair Without Losing Impact
Choose one or two display-use cases for Story in any given project. Use it for the main headline or the central quote. Then pair it with a clean, neutral companion font for supporting text. A simple sans-serif like a classic geometric or a subtle serif works well. The contrast between the brush strokes and the clean companion creates visual hierarchy. Your viewer knows where to look first and where to read next.
If you are designing a greeting card, use Story for the sentiment, and a neutral font for the inside message. If you are building a brand identity, reserve the brush font for the logo or primary tagline, and use something more readable for everything else. This approach preserves the font's impact while keeping the overall design accessible and professional.
Neglecting Resolution and Output Context
Handmade brush fonts carry subtle texture and stroke variation. These details are part of what makes Story attractive. But those same details can become problematic depending on how and where you use the font.
People often design at full size on a high-resolution screen, export a file, and then wonder why the same design looks muddy or loses detail when printed at a small scale or viewed on a low-resolution display. The brush strokes that looked beautiful at 72 points can become a blurry mess at 18 points.
What to Check Before You Finalize
Test Story at the actual size it will be used. If you are designing a business card, place the font at real business card size on your screen and see if the details hold up. If they don't, consider scaling up your layout or using a simpler font for that specific application. Similarly, if the design will appear primarily on screens, check how it renders at common viewing sizes. Thin brush strokes can disappear on low-resolution screens if the contrast is insufficient.
Also check your background. Story works beautifully on textured or colored backgrounds, but it can become harder to read if the background competes with the brush stroke details. Test your design on white, light gray, and a few colored backgrounds before you commit.
Downloading Without Checking Licensing and Format
The excitement of finding a font you love often leads to a quick download without reading the fine print. Then, weeks or months later, you discover that the license you purchased doesn't cover the specific use case you need. Maybe it restricts commercial use to a certain number of sales. Maybe it doesn't include web embedding. Maybe the file format is incomplete.
Story is available as a commercial font, and like all quality typefaces, it comes with specific usage terms. Before you download or buy, ask yourself exactly how you plan to use it. Do you need it for printed products you will sell? Do you need to embed it on a website? Do you need to use it in a logo that will be trademarked? The answers to these questions determine which license you need.
A Practical Approach
Read the licensing page before you click purchase. Look for terms around commercial use, web use, app use, and embedding. If something is unclear, contact the seller directly. A reputable font foundry will answer your questions. This step saves you from legal headaches and ensures you can use Story exactly as you envision without any surprises later.
Also confirm the file format matches your workflow. Most modern design software works with OpenType format, but if you are using older software or a specific application, check compatibility. Missing features like stylistic alternates or ligatures might not be accessible if your software doesn't support OpenType features.
Relying on Default Software Settings
Design software defaults are designed for general use. They are not optimized for a specific handmade brush font. Yet most people install Story and use it exactly as it appears in the default font menu. They never adjust kerning, leading, or tracking. They never explore OpenType features. They essentially use a fraction of what the font offers.
What You Should Adjust
Start with kerning. Many brush fonts benefit from visual kerning adjustments, especially between letters that naturally create large gaps or tight overlaps. Use your software's optical kerning option first, then manually tweak pairs that still look unbalanced. This alone transforms the appearance of your text.
Next, adjust leading. Brush fonts with tall ascenders and deep descenders need more vertical space than standard fonts. If your lines of text are too close together, they compete and become hard to read. Give them room.
Finally, explore the OpenType panel. Enable ligatures. Try stylistic sets. Test contextual alternates. Each of these features changes how Story behaves, and you might discover a version of the font that works better for your specific project than the default setup.
The Bottom Line for Using Story Well
Story is a versatile, attractive handmade brush font that can elevate your design projects when used with intention. The difference between a mediocre result and an outstanding one comes down to understanding what the font needs from you. It needs you to use its alternates. It needs you to pair it thoughtfully. It needs you to test it at real sizes. It needs you to read the license. It needs you to adjust your software settings instead of accepting defaults.
None of these steps are complicated. They just require awareness and a few extra minutes of effort before you finalize your work. Take those minutes, and your invitations, branding materials, cards, quotes, and posters will look the way you imagined when you first saw the font preview. Skip them, and you will likely end up frustrated, wondering why such a beautiful font isn't working the way you expected. The font works. The approach is what makes the difference.